Building Your Dream 8x12 Lean-To Shed: A Step-by-Step Guide
Transform your backyard with a practical and aesthetically pleasing 8x12 lean-to shed! This comprehensive guide walks you through each stage, from planning to finishing touches, empowering you to build your own storage solution. Forget expensive contractors â€" you'll be surprised how achievable this project is with careful planning and a little elbow grease.
Phase 1: Planning and Preparation
Site Selection and Design
Begin by carefully selecting your shed's location. Consider proximity to your house (for easy access), sunlight exposure (for natural ventilation), and existing landscaping. Measure the designated space meticulously. Sketch your design, noting dimensions (8ft x 12ft), door placement, and any desired windows. Determine the desired height of the shed's walls and roof. Will you use standard lumber, or consider treated lumber for greater weather resistance? Think about the overall aesthetic â€" do you want a rustic look or something more modern? A well-thought-out plan significantly streamlines the building process.
Obtaining Necessary Permits
Check with your local building department to determine if you need permits. This often depends on the size and complexity of the structure. Secure all necessary permits *before* beginning construction to avoid costly delays or fines later. Gather the required documentation promptly and be prepared to answer questions about your plans.
Gathering Materials and Tools
Create a detailed materials list. This should include pressure-treated lumber for the base, framing lumber for the walls and roof, roofing materials (e.g., asphalt shingles, metal roofing), fasteners (nails, screws), concrete for the foundation (if necessary), doors, windows, and any desired finishing materials. Don't forget essential tools: measuring tape, level, saw (circular saw or hand saw), hammer, drill, shovel, post-hole digger (if applicable), and safety glasses.
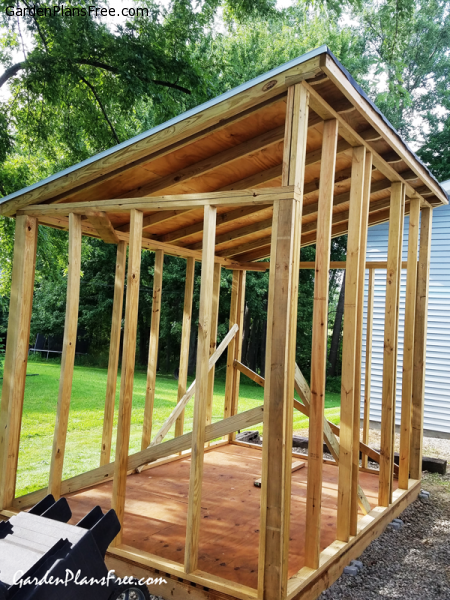
Phase 2: Foundation and Framing
Preparing the Foundation
A solid foundation is paramount. For a simple lean-to shed, you might opt for a gravel base, concrete slab, or concrete piers. If you choose a gravel base, level the ground, then lay down a layer of gravel compacted firmly. For a concrete slab, excavate the area, set up forms, and pour and finish the concrete. Concrete piers offer increased durability in areas prone to frost heave; install them according to manufacturer specifications.
Framing the Walls
Construct the walls using pressure-treated lumber, creating a frame with vertical studs. Ensure the walls are plumb and square using a level. Pre-assemble the wall frames on the ground for easier handling. Once complete, erect the wall frames onto the foundation, securing them with appropriate fasteners.
Framing the Roof
Construct the roof frame, typically using rafters or trusses. Rafters are more common for lean-to sheds. Ensure proper slope for water runoff (a minimum of 4:12 pitch is recommended). Attach the roof frame securely to the top of the walls. Remember to center the rafters appropriately to ensure proper load distribution.
Phase 3: Roofing, Siding, and Finishing
Installing the Roofing Material
Install underlayment to protect the roof structure from moisture. Then, begin applying your chosen roofing material, following the manufacturer's instructions carefully. Work from the bottom up, ensuring each shingle or metal panel overlaps correctly to create a watertight seal.
Adding Siding and Trim
Cover the exterior walls with your preferred siding (e.g., vinyl, wood, metal). This adds weather protection and enhances aesthetics. Install trim around windows, doors, and corners for a polished look. Use appropriate caulking to seal any gaps.
Installing Doors and Windows
Install the door and any desired windows, ensuring proper alignment and secure fastening. Check for proper operation and make adjustments as needed. Remember to apply weatherstripping to ensure energy efficiency and minimize drafts.
Phase 4: Final Touches
Inspect your work carefully. Address any minor imperfections before moving on. Add any final touches, such as painting or staining the exterior, installing shelves inside, and adding a floor. Enjoy your newly built lean-to shed! Remember to take pictures of the process â€" it’s a rewarding accomplishment!
Safety First! Always prioritize safety. Wear appropriate safety gear (safety glasses, gloves, hearing protection) throughout the entire building process. If you're unsure about any step, consult with a qualified professional.
0 comments:
Post a Comment
Note: Only a member of this blog may post a comment.